When Engage moves records through a campaign it stores a record for every step. This allows you to create detailed campaign history selections. To prevent your stored campaign history from accumulating too much data and creating performance issues, you can manually manage your campaign history, or set up automated removal of history.
Campaigns as selections
When using the Campaign Element within an Engage Selection, you can select individuals based on the campaigns they have been sent using the CampaignSelection syntax.
When using this selection element you will see components unique to BlueVenn campaign history. These allows you to adjust and configure your Campaign history selection.
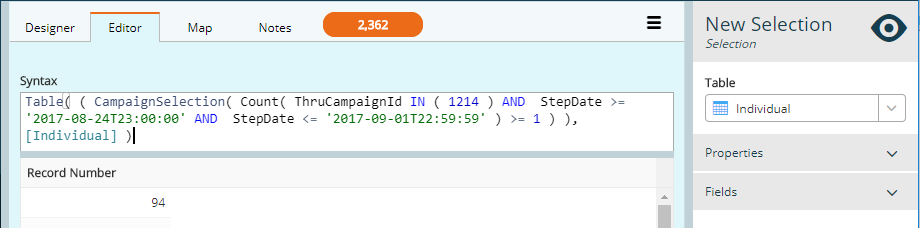
With access to the above CampaignSelection syntax, you can create powerful new campaign history selections, refined to your requirements.
Manually manage your campaign history
There are two methods for managing campaign history within Engage: within the campaign or using the campaign usage tab in the tools menu.
Within the campaign
If you wish to clear all the history for a given campaign, you can open the campaign and use the clear campaign history icon in the hamburger menu to remove all history and response data.
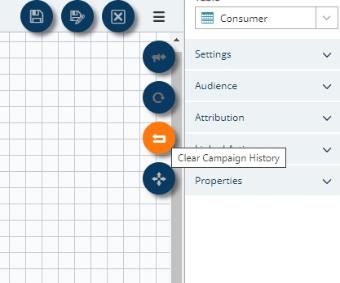
Note: clear will remove all records and reset all campaign steps.
This is useful for when you create a campaign for testing, performing trial runs, experimenting with audience segmentation, etc., where you might want to clear your data but keep the campaign structure.
Tools - campaign usage
The campaign usage tab allows you to manually prune or delete data on a campaign prior to a chosen point in time. Delete will remove all records that are not currently active on a campaign step. Pruning removes records in the campaign history from the following steps marked Y.
| SQL step type | Engage step name | XML type | Pruned |
|---|---|---|---|
| 1 | Audience |
Audience |
N |
| 2 | Merge |
Merge |
Y |
| 3 |
Communication |
Communication |
N |
| 4 | Volume Split |
SplitVolume |
Y |
| 5 | Yes No Split |
SplitYesNo |
Y |
| 6 |
SplitRandom |
||
| 7 | Response |
SplitResponse |
N |
| 8 | Wait |
Wait |
Y |
| 9 | Seed List |
SeedList |
Y |
| 10 |
CampaignSelection |
||
| 11 | Dedupe |
Dedupe |
Y |
| 12 | Exit |
Exit |
N |
| 13 | Field Split |
SplitFieldValue |
Y |
| 14 |
Query Split |
SplitQueryList |
Y |
| 15 |
Filter |
||
| 16 | Control |
Control |
Y |
| 17 | Tag |
Tag |
Y |
| 18 | Dynamic Split |
SplitDynamic |
Y |
| 19 | Integration |
Integration |
N |
| 20 | Link To |
JoinOut |
N |
| 21 | Link From |
JoinIn |
N |
| 22 | Implied |
ImpliedAudience |
N |
| 23 | Volume Limit |
VolumeLimit |
Y |
| 24 | Multi Variant Test |
MultiVariantTestingStep |
Y |
| 25 | Cascade | Segmenter | N |
| 26 | Triggered Audience | TriggeredAudience | N |
Automatically remove campaign history
There are two methods for automating campaign history management within Engage: using the campaign's schedule tab or using the campaigns tab in the settings menu.
Using the schedule tab
-
Open the campaign and click the schedule tab.
-
Open the edit dropdown and select add schedule item.
-
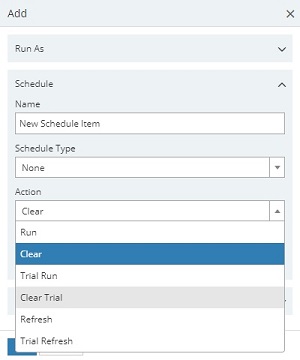
In the add window, give the schedule a name and a schedule type (e.g. monthly).
-
In the action dropdown, select the clear option or clear trial option (depending on which type of history you wish to clear).
-
Click the OK button and save your schedule.
Settings - campaigns
If you know that you will not need campaign history after a given point in time, you can set a prune date and/or a deletion date using the campaigns tab within the settings menu.
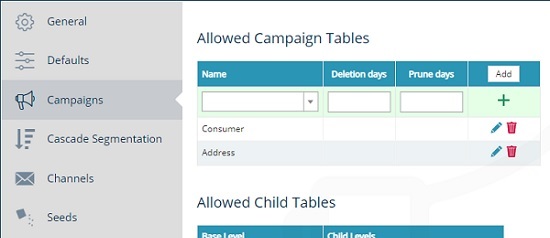
Note: The prune and deletion dates are set at the table level and apply to all campaigns against that table.